1 · 打开
解压压缩包,用3ds Max打开水波_打开先看效果.max。它从第40帧开始,避开透明的开头。
单张参考图 · 可编辑3ds Max练习
已经做好平面、Arnold材质、蓝白圆环、透明边缘、向外传播动画和相机。无需你先连接整张节点图。
下载工程+预览只下载打开即看的.maxSTART HERE · ENGLISH PARAMETER NAMES
First open the finished scene. Then change only Emission: try 0.5, 1.5, and 3.0. Render after each change. The rings should become darker or brighter; their shape should stay the same.
| Parameter | What you see |
|---|---|
| Emission | How bright the pattern looks. |
| Emission Color | Which colors the pattern uses. |
| Opacity | White = visible. Black = invisible. Gray = partly visible. |
| Gradient Ramp | A pattern made from color stops. Radial arranges the stops from the center outward. |
| Cellular | A procedural pattern used here as a source for small details. It does not automatically mean bubbles or holes. |
| Composite | Combines maps. The result depends on each layer’s Blend Mode and Opacity. |
The Blend Modes and detailed parameters are not shown. These connections alone do not tell us which layer adds, removes, or brightens pixels.
The supplied project is a simpler reconstruction: six Radial ramps make the rings. It does not claim to reproduce all the hidden nodes in your teacher’s graph.
For now: change Emission only. Leave the other nodes connected.
这是一张平面上的程序材质特效,不是流体模拟。参考图没显示的部分由我补齐,参数不冒充老师原值。
解压压缩包,用3ds Max打开水波_打开先看效果.max。它从第40帧开始,避开透明的开头。
已经设好Ripple_Camera。按F9渲染;普通灰色视口不代表最终材质效果。
打开蓝白水波_可编辑动画.max使用完整0–100帧。也可运行“打开并定位水波.ms”,当前作品未保存时会停止提示,保存后再运行即可打开并切到40帧。
想看节点时,在本工程运行显示水波节点图.ms。节点已连接,脚本只是让Slate图排好。
01的六个Radial渐变各做一圈。02用Screen合并,哪里亮,哪里就有波纹。
03把同一个黑白形状重新配色:暗处深蓝,亮处冰蓝白,连接Emission Color。
04让边缘淡出,05打碎细节,06控制时间。07把它们相乘,连接Opacity;黑色部分透明。
先改03的颜色就能换配色。想让环更粗,扩大每个01节点中“白色峰值两侧黑色标记”的间距。不要一开始同时改全部节点。
| 对象 / 节点 | 设置 | 用途 |
|---|---|---|
| Plane | 200×200cm,1×1段,UV通道1 | 承载纹理,不靠大量网格产生波纹 |
| Arnold Standard Surface | Base0,Specular0,Emission1.5 | 先让图案清晰显示,减少反光干扰 |
| 01 圆环 | 6圈;Radial;黑白峰半宽5;Noise Amount .01、Size .12 | 清楚的圆环带少量不规则变化 |
| 02 合成 | Screen | 取每圈较亮的部分 |
| 03 配色 | Mapped;色标0/25/60/100:RGB(3,12,30)/(18,55,110)/(70,140,220)/(190,230,255) | 由深蓝过渡到冰蓝白 |
| 04 外缘 | Radial;0白、65白、88灰100、100黑 | 最外圈不突然截断 |
| 05 细节 | Fractal Noise,Object XYZ,Size2.2cm,灰145与白255 | 让亮圈有轻微水纹颗粒 |
| 06 时间遮罩 | 0帧黑,8帧白,80帧白,100帧黑 | 出现和消失,开始/结束看不见是预期 |
| 相机 | (0,-330,160)看向原点,FOV45° | 圆形平面从斜角看呈椭圆 |
动画修改的是每圈渐变的色标位置:半径随时间增加,到外缘淡出后从中心接续。默认0–100帧、30fps;预览进行了抽帧。
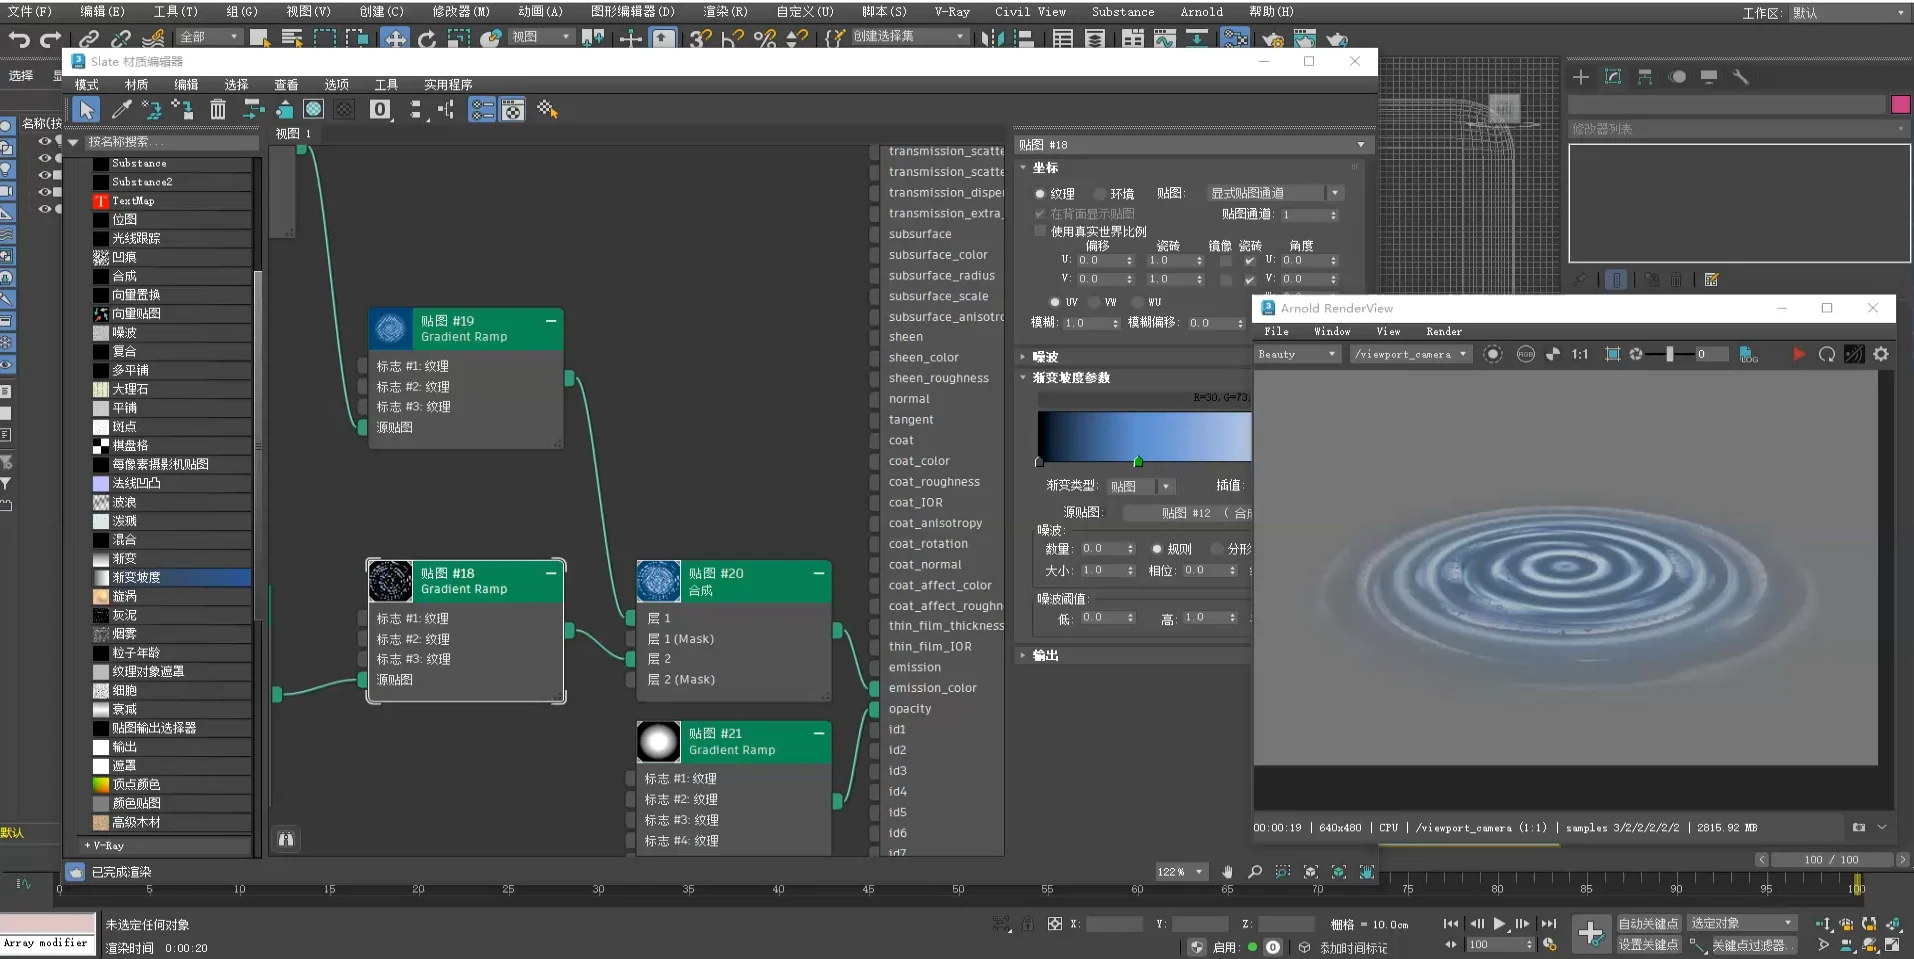
参考图可确认Composite连接Emission Color、另一张Gradient Ramp连接Opacity。截图左侧圆环生成链未显示完整,本练习采用可理解的六圈Radial渐变组合;并非声称复刻了老师所有隐藏节点。