PARTICLE FLOW · SOURCE SCENE STUDY
One particle system.
Understand one operator at a time.
这一页对应 11月9课堂5–8 的粒子学习内容,并用你提供的 Test7.max 核对保存状态。当前是课堂工程讲解与学习副本,尚不是“炸碎”考核成品。
下载可编辑学习副本课堂5 · 课堂6 · 课堂7 · 课堂8
先打开工程,按 6 打开 Particle View。
本工程使用 Scanline + Standard (Legacy)。先保留源设置观察结果;Arnold 转换需要另外验证材质与粒子渲染。
先认识两个不同的对象
| Operator | 源工程设置 | 作用 |
|---|
| Position Object | GeoSphere001 | 决定粒子从哪个对象的位置分布生成。 |
| Shape Instance | GeoSphere002 · Scale 100% | 决定每一颗粒子看起来是什么形状。它不是发射位置。 |
| Birth | Emit Start −5 · Emit Stop −5 · Amount 120 | 在 −5 帧一次生成 120 颗,因此 0 帧已经能看到粒子。 |
| Speed | Speed 0 · Variation 0 | 这个操作器没有给粒子初始移动速度;模型缩放等变化仍可发生。 |
| Split Amount | Every Nth = 2 | 每隔一颗分流,送入另一条事件路径。 |
| Material Static | Assigned Material = Fog | 把源工程的 Fog 材质指定给粒子。 |
跟着操作:只改一个值
- 打开学习副本,按 6。
- 在 Event 001 中点 Birth / 出生 001,确认 Amount 为 120。
- 把 Amount 改成 30,回到时间轴起点再播放。颗粒数量应该减少。
- 恢复 Amount = 120。点 Speed / 速度 001,先只观察 Speed = 0。
- 点 Shape Instance / 图形实例 001,核对拾取对象是 GeoSphere002。不要把它与 Position Object 中的 GeoSphere001 混淆。
上面是基于实际源工程设计的学习实验,不冒充教师在原片里的逐秒操作顺序。按同一顺序重新打开文件即可恢复原值。
Scale 如何改变形状
| 操作器 | X / Y / Z Scale | X / Y / Z Variation |
|---|
| Scale 001 | 110 / 80 / 100% | 20 / 20 / 20% |
| Scale 002 | 70 / 130 / 110% | 30 / 56 / 98% |
| Scale 004 | 101 / 101 / 101% | 0.5 / 0.5 / 0.5% |
| Scale 005 | 99 / 99 / 99% | 0.5 / 0.5 / 0.5% |
Scale 001 / 002 在界面显示 Inherit Once;Scale 004 显示 Relative Successive。后者会连续叠加,不能把 101% 理解为只放大一次。
实际打开的 Particle View
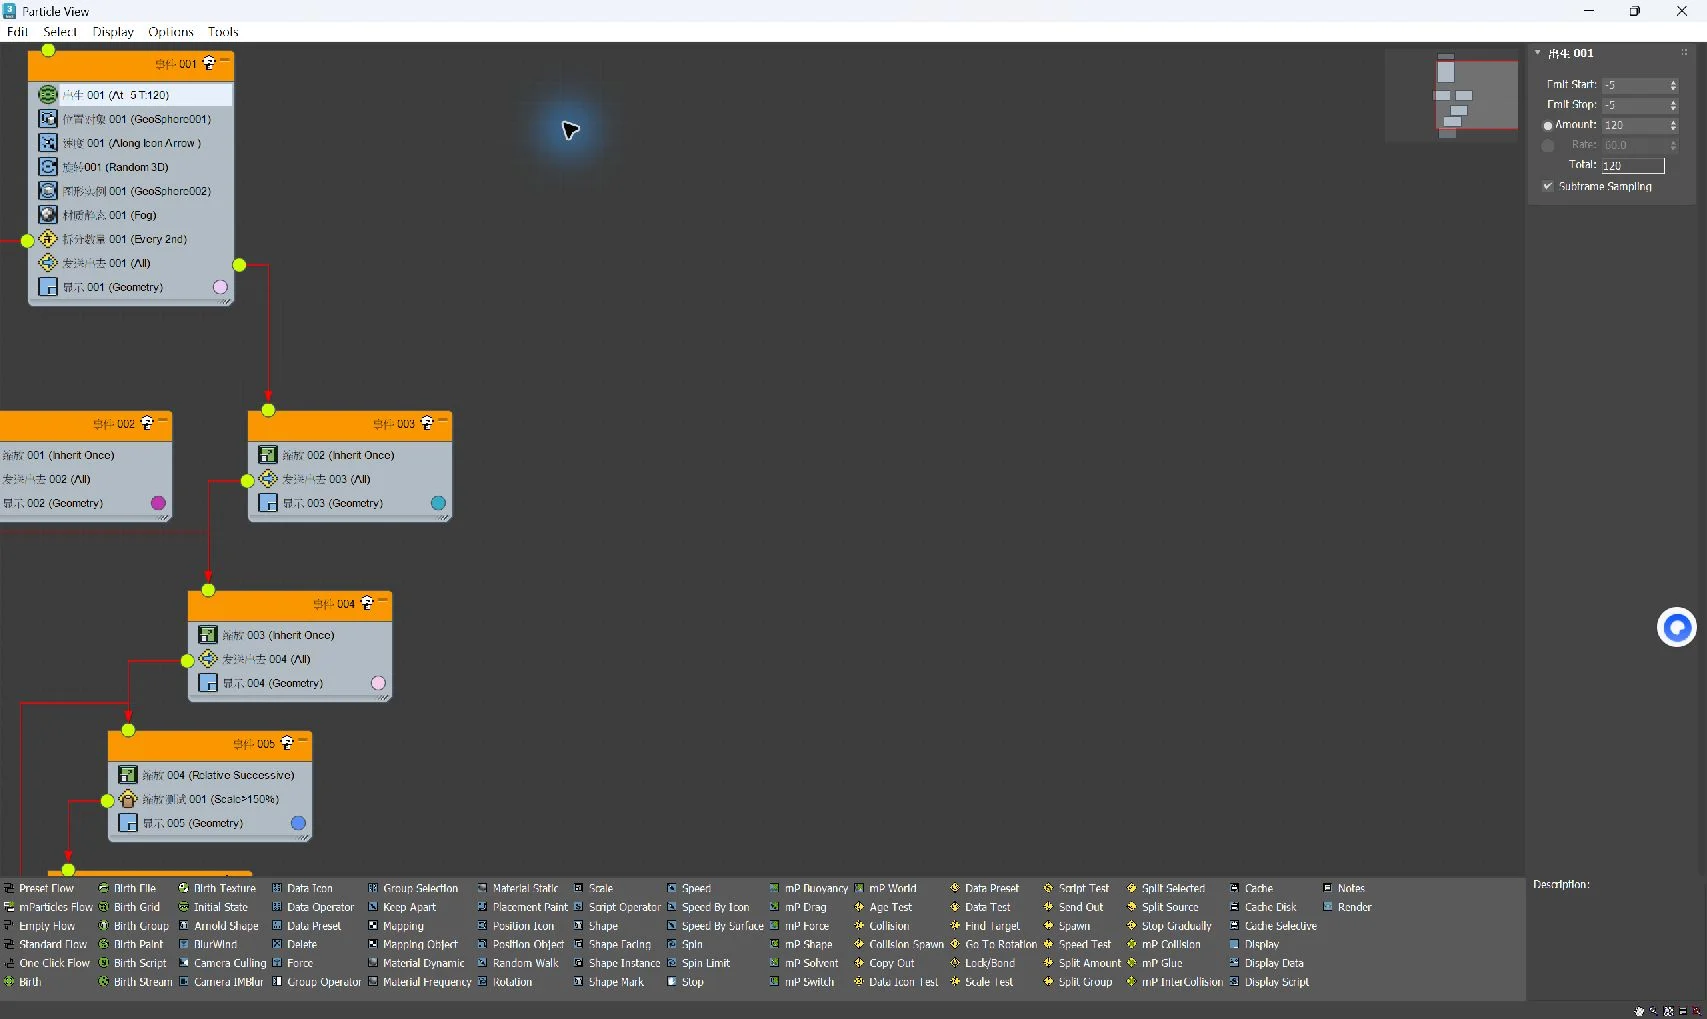
界面已核对 Birth −5 / −5 / 120,并另存学习副本。完整动画、最终材质渲染和各事件接线仍需继续逐项验收。
完整源参数记录 · 原记录时间字段使用内部 ticks;本页 Birth 已按 30 fps 转成帧。
第一次 F9:排查视口与最终渲染的区别
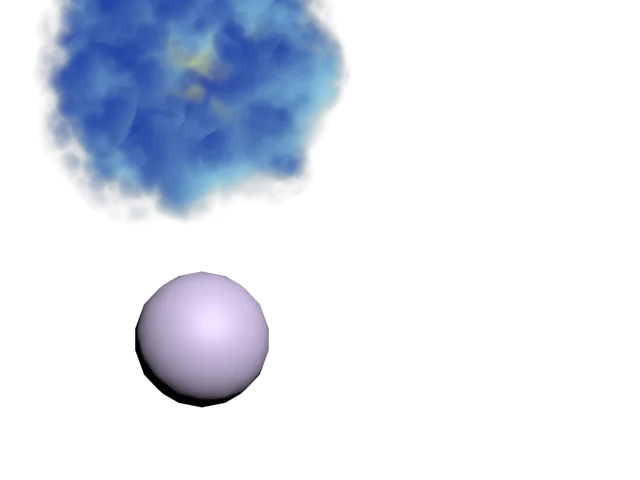
通过 Max 界面实际渲染:视口里的绿色团块,渲染后是蓝色云状材质。这个诊断图仍使用源文件的 Left 视口,顶部被裁切,底部还有用于 Shape Instance 的球体。它用于确认材质能够渲染,不是最终交付构图;下方 Camera study 已修正构图与辅助物体可见性,并提供动画采样预览。
Camera study — open, render, play
已重新打开保存的 MAX 文件并在 3ds Max 界面按 F9 验证。下面的动画来自保存后重新载入的场景:frame 0–100,每 4 帧采样,共 26 张,7.5 fps 播放。它是低采样预览,不是逐帧最终输出。
Download editable camera study (.max) Download preview
Open and reproduce
- Open ParticleFlow_Camera_Study.max. The active lower-left viewport is Study_Camera. Press F9 to render frame 0.
- The green viewport object is a display color; use the rendered image to inspect the Fog material.
- Press 6 to open Particle View. Position Object uses GeoSphere001; Shape Instance uses GeoSphere002.
- Scrub from frame 0 to 100 to inspect the changing cloud shape. Speed = 0; this is not an outward-moving explosion.
Camera and visibility — supplemental settings
These presentation settings were added by script, then checked through the Max interface. They are not claimed as teacher values. The source Particle Flow operators and material were retained.
| Setting | Value / purpose |
|---|
| Camera type / name | Free Camera / Study_Camera |
| Position | X 0, Y −200, Z 60 cm |
| Viewing direction | Looking toward X 0, Y 0, Z 60 cm |
| FOV | 45°; frames the full cloud |
| Output Size | 640 × 640 |
| GeoSphere001 / GeoSphere002 → Renderable | Off; retained as particle references, omitted as standalone objects in the render |
| Renderer / frame rate | Source Scanline / 30 fps |
To inspect visibility manually: select a source GeoSphere, right-click → Object Properties → Rendering Control → Renderable. Do not delete the sphere: the particle operators still reference it.
All 26 render samples contained 120 particles. The cloud changes shape while the particle count stays fixed. This study does not prove collision, gravity, shattering or FumeFX requirements.
Saved-scene render record